
Struggling to add custom code to your WordPress header or footer without breaking your site? Many users find it confusing to insert scripts like Google Analytics or tracking pixels, especially when theme updates wipe out their changes or a small mistake crashes the website.
Fortunately, there are three main ways to do this:
- Manually using
functions.php(child theme) - Using a dedicated header/footer plugin
- Using Easy Elements (recommended)
In this guide, we’ll cover all three methods, explain the pros & cons, and show you the best and safest approach.
Method 1: Add Custom Code Manually Using functions.php (Child Theme)
This is the traditional developer method and works without any plugin.
⚠️ Important Before You Start
❗ Always use a child theme.
Editing the parent theme will cause your changes to be lost after updates.
Step-by-Step: Add Code to Header via functions.php
Open your child theme’s functions.php file and add this code:
function add_custom_code_to_header() {
    ?>
    <!-- Custom Header Code -->
    <script>
        // Your custom script here
    </script>
    <?php
}
add_action('wp_head', 'add_custom_code_to_header');
This will output your code inside the <head> section.
Add Code to Footer via functions.php
function add_custom_code_to_footer() {
    ?>
    <!-- Custom Footer Code -->
    <script src="custom-script.js"></script>
    <?php
}
add_action('wp_footer', 'add_custom_code_to_footer');
❌ Problems with the Manual Method
While this works, it has drawbacks:
- Requires coding knowledge
- Risk of breaking the site with syntax errors
- Not beginner-friendly
- Hard to manage for multiple scripts
- Not ideal for non-developers or agencies
For most Elementor users, this approach is unnecessarily complex.
Method 2: Using a Separate Header & Footer Plugin
Many users install a plugin just to add header or footer scripts.
Downsides:
- Adds extra plugin bloat
- More updates to maintain
- Possible conflicts
- One plugin for one small task
If you’re already using a powerful Elementor addon, this is often redundant.
Method 3: Add Custom Code Using Easy Elements (Recommended ✅)
If you’re using Easy Elements, you don’t need to touch theme files or install extra plugins.
Easy Elements provides a built-in custom code manager that lets you safely add code to your site.
Step-by-Step: Add Header & Footer Code with Easy Elements
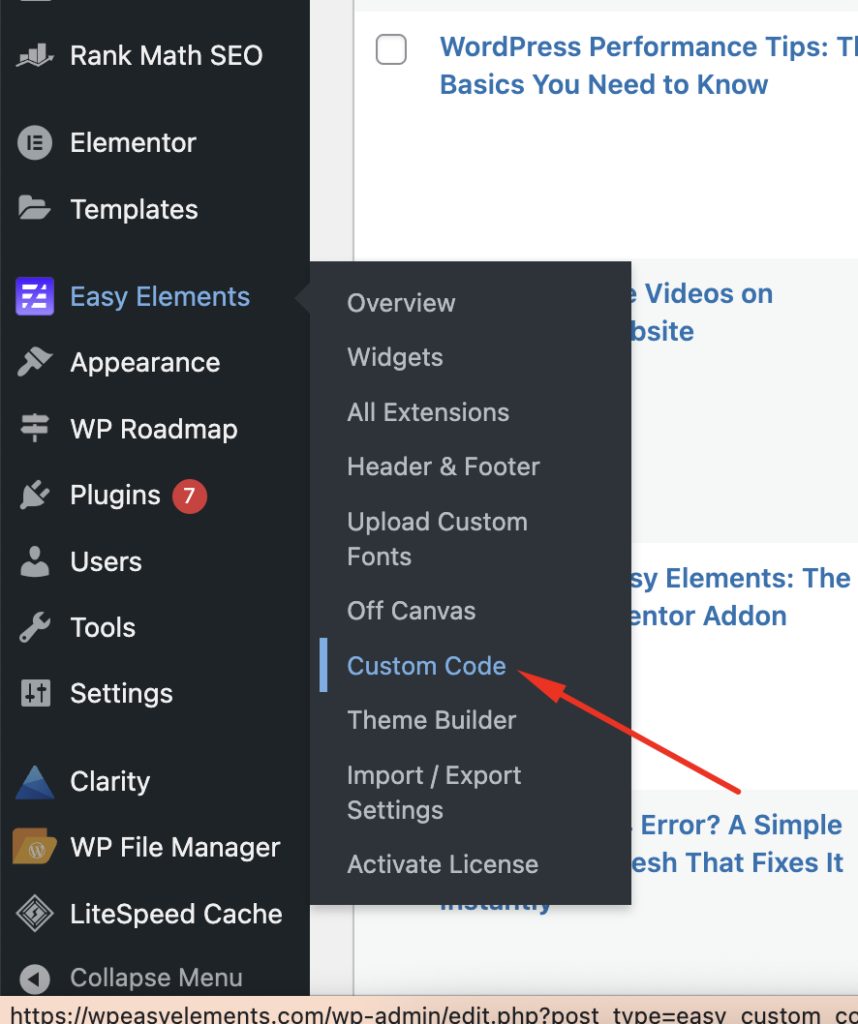
Step 1: Open Easy Elements Settings
Go to your WordPress dashboard:
Easy Elements → Custom Code
Step 2: Add Header Code
Paste your script or meta tag into the Header Code field.
Example:
<meta name="google-site-verification" content="your-code-here">
This code will load inside the <head> section.
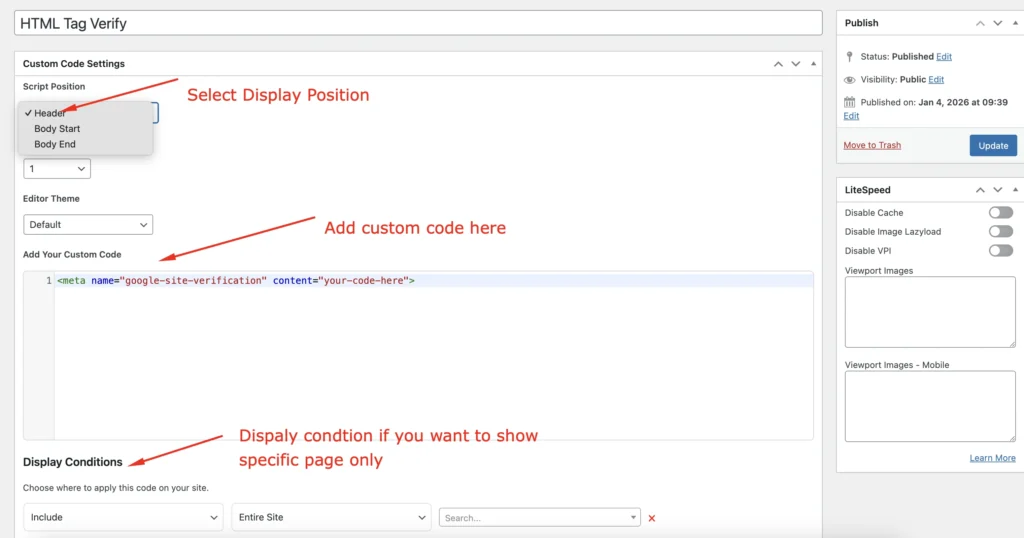
Step 3: Add Footer Code
Paste scripts that should load at the bottom of the page into the Footer Code field.
Example:
<script src="custom-script.js"></script>
Step 4: Save Changes
Click Save, and your code is instantly applied site-wide.
No theme editing. No extra plugin.
Why Easy Elements Is the Best Option
✔ No coding required
✔ Safe and update-proof
✔ Centralized script management
✔ No extra plugins
✔ Perfect for Elementor users & agencies
You manage design + animations + custom code in one place.
Header vs Footer: Where Should You Add Code?
| Type of Code | Recommended Location |
|---|---|
| Meta tags | Header |
| Google Analytics | Header |
| Verification codes | Header |
| Chat widgets | Footer |
| Custom JS | Footer |
Final Thoughts
If you’re a developer, the manual functions.php method works but it’s not ideal for most users.
For a clean, beginner-friendly, and performance-safe solution, using Easy Elements is the smartest approach.
One plugin. One dashboard. No unnecessary complexity.
Want to manage design, animations, and custom code without plugin overload?
Easy Elements helps you build smarter Elementor websites.